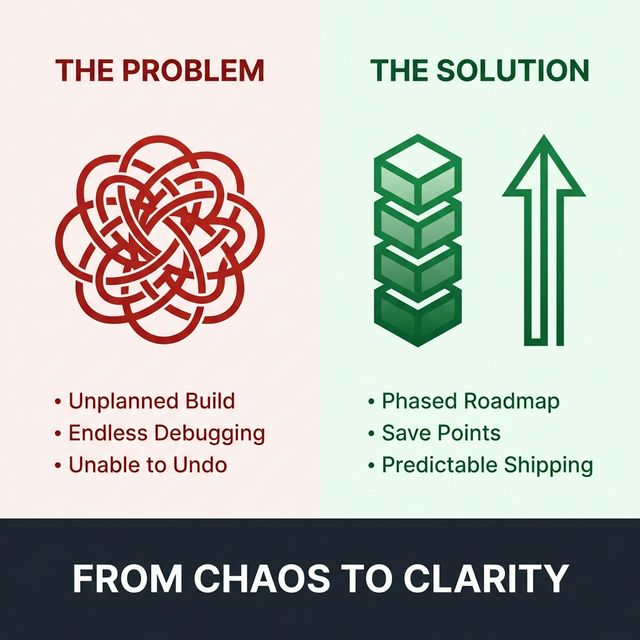
 From chaos to clarity - structured AI-assisted development
#The 60-minute problem
Last month I watched a designer do something that would've felt impossible a year ago. They had an idea in the morning. By lunch, they had a working prototype on a URL. Then—within 10 minutes of showing it to a real user—it fell apart.
Not because the UI looked bad.
Because the unwritten parts weren’t there:
- What happens when there’s no data?
- What’s MVP vs “nice to have”?
- Why did the AI change 12 files for one tiny tweak?
- How do we undo this safely?
That’s the new reality:
AI makes building fast. It doesn’t automatically make building clear.
So if you’re a designer using any AI coding tool (terminal agents, editor agents, or chat builders), the skill you’re really learning isn’t “coding.”
It’s this:
How to turn design thinking into decisions an AI can execute—without guesswork.
This is a workflow you can follow step by step. No frameworks to memorize—just a repeatable loop that keeps you shipping and learning.
#What this guide helps you do
By the end, you’ll be able to:
- go from idea → working prototype without chaos
- build in phases (like a product team)
- avoid the endless debug loop
- keep design consistency across iterations
- get real feedback faster than the old “prototype → handoff → wait” cycle
If you’ve ever thought,“AI can build it, but I can’t control it,”this is for you.
#Quickstart (10 minutes)
If you want the fastest path, do only this first:
- Tell the AI: “Create
.planning/PROJECT.mdand ask me only what you need.” - Then: “Create
REQUIREMENTS.md(MVP/V2/out-of-scope) and include states.” - Then: “Create
ROADMAP.mdwith 5 phases and shippable checkpoints.” - For the current phase: “Create
NN-CONTEXT.mdas a mini spec.” - Start building using the 5-prompt script (Part 3).
Everything else in this guide is depth and refinement.
#The core idea
Don’t change your process. Change your tool—and write down the decisions.
Understand users → Define the problem → Generate ideas → Prototype → Test → Iterate
AI changes the tempo:
- you can run more cycles of hypothesis → build → feedback → improvement
More cycles = better insights.
But only if you stop doing “build first, think later.”
#The core idea
Don’t change your process. Change your tool—and write down the decisions. AI doesn’t replace your process. It removes waiting. Your job stays the same: make good decisions. The tool’s job: execute faster. Here is an example for you
1) Understand users (what’s actually happening?)
Tell your preferred AI tool:
- “Turn these notes into themes, contradictions, and top user pains.”
- “Draft 10 interview questions for this product and my target user.”
- “What assumptions am I making? List risks and how to validate.”
Output you keep: a short PROJECT.md with the user + their job.
2) Define the problem (choose what you’re solving)
What you do: narrow the scope. Decide what “success” means.
How AI helps:
- Converts your goal into a clear problem statement.
- Separates symptoms from root causes.
- Writes a crisp MVP definition.
- Lists edge cases you’ll forget (empty states, failure paths).
Tell your preferred AI tool:
- “Write the problem statement and success metrics in plain English.”
- “Define MVP vs V2 vs out-of-scope.”
- “List the edge cases and failure scenarios for this flow.”
Output you keep: REQUIREMENTS.md (MVP/V2/out-of-scope + states).
3) Generate ideas (explore options fast)
What you do: explore multiple approaches before committing.
How AI helps:
- Produces 5–10 concept directions quickly (not final UI).
- Generates alternative flows and information architecture.
- Helps you pressure-test with trade-offs.
Tell your preferred AI tool:
- “Give me 5 possible user flows. For each: pros/cons, complexity, risks.”
- “Suggest 3 interaction patterns for this problem and when to use each.”
- “What would a simpler version look like?”
Output you keep: 1 chosen approach + rejected options (so you don’t loop).
4) Prototype (make it real enough to learn)
What you do: build something testable, not perfect.
How AI helps:
- Converts your “decisions” into UI quickly.
- Generates components, layouts, and states.
- Speeds up the boring part (wiring + scaffolding).
Tell your preferred AI tool:
- “Build Phase 2 only. Implement Task 1 only. After that, explain how to verify.”
- “Create intentional loading/empty/error states.”
- “Make it responsive at 375/768/1440.”
Output you keep: a working prototype + save points + verification steps.
5) Test (learn, don’t just demo)
What you do: observe confusion, friction, and unmet expectations.
How AI helps:
- Creates a test script and scenarios.
- Turns observations into themes and next actions.
- Helps you decide what to fix now vs later.
Tell your preferred AI tool:
- “Write a 10-minute usability test script for this prototype.”
- “Summarize feedback into: critical / important / nice-to-have.”
- “Convert these findings into changes in REQUIREMENTS + ROADMAP.”
Output you keep: updated decisions, not just comments.
6) Iterate (ship the next learning cycle)
What you do: improve based on real feedback and ship again.
How AI helps:
- Breaks fixes into small tasks.
- Implements scoped changes without refactoring everything.
- Keeps your progress safe via save points.
Tell your preferred AI tool:
- “Fix only these UAT issues. Don’t change anything else.”
- “Create a save point after this works, with message: ____.”
- “Update STATE.md: what’s done, what’s next, decisions made.”
Output you keep: faster cycles + better clarity.
#What AI changes: the tempo, not the method
Traditional loop:
Understand → Define → Ideate → Prototype → Test → Iterate
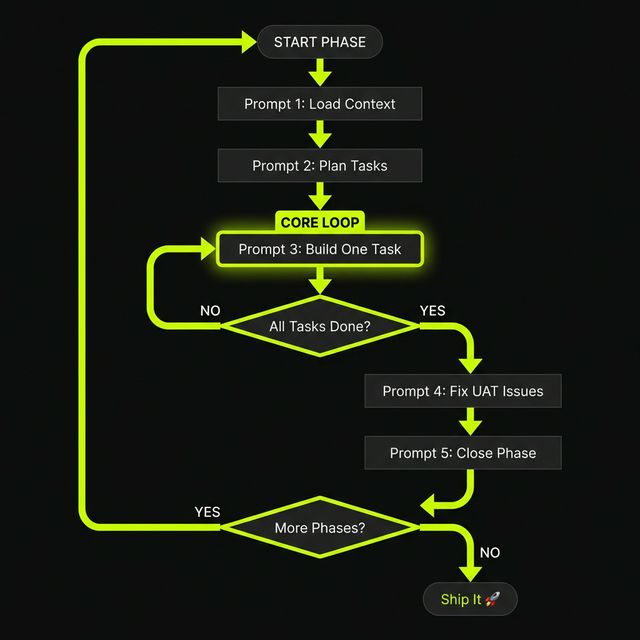 Traditional workflow loop
AI-assisted loop:
Hypothesis → Build → Feedback → Improve
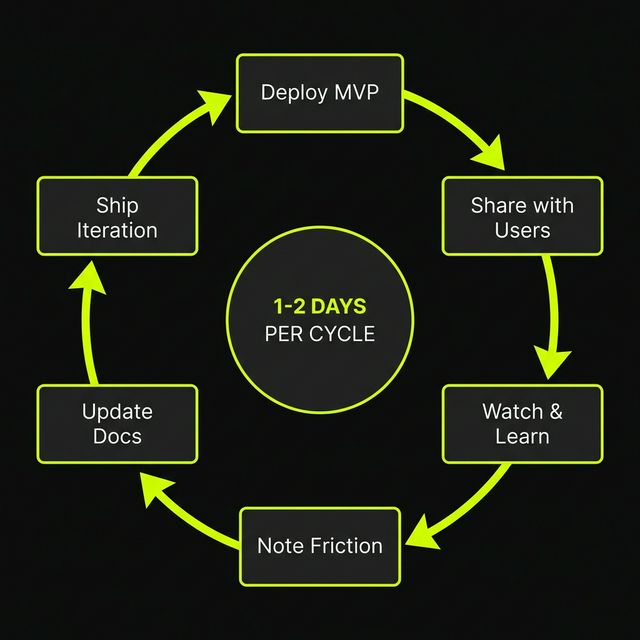 AI-assisted feedback loop
This can happen in days (or even hours),because the tool removes waiting.You don’t win by building once. You win by runningmore learning loopsin the same time.
But there’s a catch
AI speed only helps if you stop doing:
“Build first, think later.”
Because when you skip decisions:
- the tool guesses
- the scope explodes
- the style drifts
- you end up debugging forever
So the new skill is simple:
Write the decisions. Then let AI execute. Repeat.
#Part 1 — Two foundations
#Foundation 1:
Learn git “save points”
Git isn’t a developer hobby. It’s what makes iteration safe.
Without Git: every AI change feels risky. With Git: you can experiment, rollback, and keep moving.
Here’s the best part: you don’t have to memorize Git commands. Treat Git like a concept (save points), and tell the AI what you want in plain English.
How to tell AI to use Git (copy/paste)
Ask your preferred tool to generate a Git commit strategy and save in folder. And commit in incremental changes. So you have all checkpoints and if anything goes wronf or you didn;t expected you can roll back easily
Safety habit (the one rule that matters)
One task = one save point. Examples:
- Add projects grid shell
- Add empty state
- Fix mobile spacing
This keeps your AI-assisted build controllable.
#Foundation 2:
Software ships in phases
AI tempts you to build everything at once. Real products don’t. They ship in increments:
- MVP first
- then features
- always with checks
If you skip this, your AI-built app becomes a fragile pile.
🔑 Takeaways from Part 1
- Git is your safety net: Treat commits as "save points" to experiment without fear.
- Atomic Work: One task = one save point. Only combine changes if they are truly related.
- Ship in Phases: Don't build the "whole thing" at once. Start with a solid MVP, then add features in layers.
- Define "Done": Know exactly what success looks like for each phase before you write a single line of code.
#Part 2 — The workflow
A quick promise: these docs are not bureaucracy. They’re how you stop re-explaining decisions, stop style drift, and stop the tool from guessing.
#Your “project brain” (created by AI, not by you)
You’re going to keep a small set of files that act like the project’s memory. The goal is simple:
Stop re-explaining yourself and stop letting the tool guess.
You don’t need to manually write these from scratch. Tell the AI to generate them, then you review and tweak.
Tell the AI to create the folder + files
Use this prompt:
“Create a .planning/ folder and draft the following files based on our conversation: .planning/PROJECT.md, REQUIREMENTS.md, ROADMAP.md, .planning/STATE.md, and NN-CONTEXT.md for the current phase. Keep them short and practical. Use bullet points. Don’t code anything yet.”
What each file is for (in plain English)
.planning/PROJECT.md— the brief (goal, user, constraints)REQUIREMENTS.md— MVP vs later vs out of scopeROADMAP.md— phases (mini backlog).planning/STATE.md— today’s status (done/next/decisions)NN-CONTEXT.md— the phase mini-spec (layout, states, “done means”)
Why this matters: AI tools perform best with stable context. These files are your stable context.
#Some examples (so it stays concrete)
Example A: Portfolio Hero → projects grid → project page → contact
Example B: Internal dashboard
- list/table view → filters → empty/loading/error → details/edit
Same workflow for both.
Step-by-step guide
Step 1 — Write the brief with AI (before you write code)
Copy/paste prompt
“Act like my product + design partner. Ask me workshop questions to clarify the problem, audience, success metrics, constraints, and edge cases. After I answer, draft .planning/PROJECT.md.”
.planning/PROJECT.md should include
- one-line goal
- primary user
- job-to-be-done
- success looks like
- constraints (must / must-not)
- assumptions + risks
- MVP definition of done
Checkpoint: If you can’t explain the MVP in 1–2 sentences, don’t code yet.
#Step 2 — Convert intent into requirements (so the AI doesn’t guess)
Most AI-built apps fail because they only describe the happy path. So we write:
- flows
- states
- edge cases
Requirements.md structure
- MVP (must-have)
- V2 (nice-to-have)
- Out of scope
For each MVP item, add:
- loading / empty / error states
- responsive notes
- accessibility notes
Example: Portfolio MVP (short)
- R1: Homepage hero + CTA
- Mobile: CTA visible without scrolling
- R2: Projects grid
- Empty: friendly message + contact CTA
- Missing image: placeholder
- R3: Project detail
- Handles long titles + long body text
Example: Dashboard MVP (short)
- R1: Table view
- Loading: skeleton rows
- Empty: “No results” + reset filters
- Error: retry button
- R2: Filters
- Clear filters button
Copy/paste prompt
“Convert my idea into REQUIREMENTS.md with MVP / V2 / out-of-scope. For MVP items, add states (loading/empty/error), responsive notes, and accessibility checks.”
#Step 3 — Plan phases like a product team (so you stop building a blob)
ROADMAP.md (simple phases)
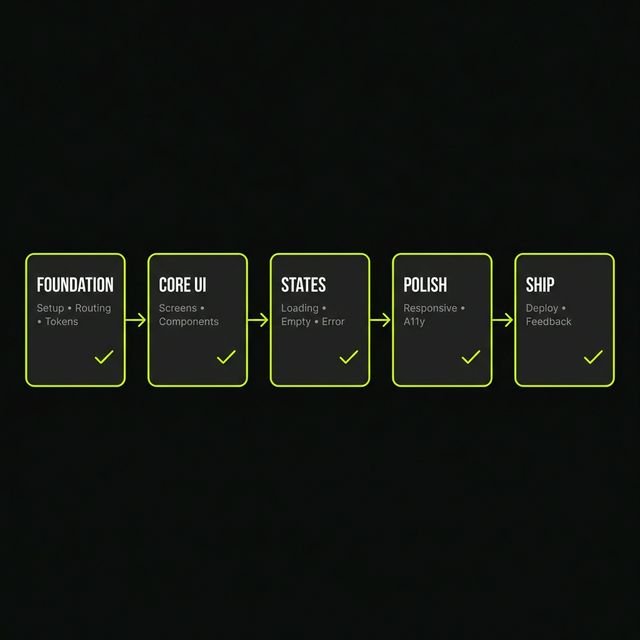 Phase progression - from foundation to ship
- Phase 1: Foundation (setup, routing, base layout, tokens)
- Phase 2: Core UI (main screens + components)
- Phase 3: Data + logic (mock → real)
- Phase 4: Quality (a11y, performance, edge cases)
- Phase 5: Ship + feedback loop
Copy/paste prompt
“Convert REQUIREMENTS.md into a phased ROADMAP.md. Keep phases small enough that each phase can be shipped and tested.”
Checkpoint: If Phase 2 can’t be finished in a couple of focused sessions, it’s too big.
#Step 3.5 — Turn phases into tickets (epics → stories → acceptance criteria)
Designers often plan the what but skip the shape of delivery.
This small step makes your build feel like real product development—and makes AI execution cleaner.
How to do it
For the current phase, write:
- 1 Epic (the outcome)
- 3–8 Stories (small deliverables)
- Acceptance criteria (how you know each story is done)
Put this either at the bottom of ROADMAP.md for that phase, or in the phase context file (NN-CONTEXT.md).
Example (Portfolio — Phase 2: Core UI)
Epic: Users can browse projects and open a project page.
Stories:
-
Projects grid layout exists (desktop/tablet/mobile)
- AC: 3/2/1 columns at 1440/768/375
- AC: cards align, spacing consistent
-
Empty state for grid
- AC: shows message + CTA
-
Loading state for grid
- AC: skeleton cards; interactions disabled
-
Project detail page shell
- AC: handles long title/body
-
Navigation
- AC: back to grid works; keyboard focus visible
Example (Dashboard — Phase 2: Core UI)
Epic: Users can view and filter a dataset reliably.
Stories:
-
Table view renders with base columns
- AC: rows align; header visible
-
Loading state
- AC: skeleton rows
-
Empty state
- AC: “No results” + reset filters action
-
Error state
- AC: readable error + retry
-
Filters UI
- AC: filter changes update results; clear filters works
Tip: AI performs better when each story is small, measurable, and ends with a verification step.
#Step 4 — Create a phase context file (so style doesn’t drift)
Before building a phase, write the decisions you’d normally keep in your head.
02-CONTEXT.md should include
- layout rules (grid, max width, breakpoints)
- spacing rules (your spacing scale)
- component behavior (hover, focus, disabled)
- empty state pattern
- responsive rules
- “done means” checklist
Portfolio example (grid decisions):
- Desktop: 3 columns, max width 1120px
- Tablet: 2 columns
- Mobile: 1 column
- Cards: 16px padding, 12px radius, subtle hover lift
Dashboard example (table decisions):
- Row height: 44px
- Sticky header
- Empty state: reset filters + CTA
Copy/paste prompt
“Based on Phase 2 in ROADMAP.md, draft 02-CONTEXT.md with concrete UI and behavior decisions.”
#Part 3 — Using any AI coding tool (operator instructions)
Any AI coding tool is like a junior dev who can type extremely fast.
Your job is to:
- keep tasks small
- lock constraints
- verify outcomes
#Paste this at the top of your session (non-negotiables)
“Rules: Implement only the current phase. Do not start future phases. Do not refactor unrelated code. Only edit files needed for the task. If you need to change dependencies, ask first. One task = one save point. After each task, summarize changes and how to verify.”
#When to reset context
If it forgets constraints, repeats old bugs, or starts changing the style:
- start a fresh session
- reload only:
PROJECT.md,REQUIREMENTS.md,ROADMAP.md, the currentNN-CONTEXT.md, and.planning/STATE.md
Think of it like starting a new sprint with a clean brief.
#Step 5 — Execute a phase with the “5-prompt script”
This is the turning point: follow this loop and your builds stop feeling random and start feeling predictable. These prompts prevent most “vibe coding” problems.
Prompt 1 — Load context
“Read ROADMAP.md, REQUIREMENTS.md, .planning/STATE.md, and 02-CONTEXT.md. Summarize the Phase 2 goal in 5 bullets. List edge cases.”
Prompt 2 — Plan (don’t code yet)
“Create a task checklist for Phase 2. Each task should be small enough for a single commit, and end with a verification step.”
Prompt 3 — Build one task (repeat)
“Implement Task 1 only. Do not refactor unrelated code. After completion, summarize changes and tell me how to verify.”
Prompt 4 — Fix only what UAT found
“Here are UAT issues: (paste bullets). Fix only these issues. Do not change anything else.”
Prompt 5 — Close the phase
“Update .planning/STATE.md with what’s done, what’s next, decisions made, and remaining risks.”
Create a save point after each task. That’s your control mechanism.
#Step 6 — UAT like a product team (not vibes)
AI can check code. Only you can check the experience.
Phase UAT checklist
- Works at 375 / 768 / 1440
- Empty state exists and is helpful
- Loading state exists
- Error state exists and is readable
- Keyboard can reach everything
- Focus states are visible
- Long text doesn’t break layout
- No surprise changes in unrelated files
If something is wrong:
- describe it precisely
- update the context doc if needed
- ask for a scoped fix
- commit
#Step 7 — Ship fast, learn faster
Deploy early. Show users. Watch them.
Loop:
- share a link
- watch someone use it (10 minutes is enough)
- note confusion + friction
- update assumptions in
PROJECT.md - adjust priorities in
REQUIREMENTS.md - ship the next iteration
This is where AI becomes more than “faster code.” It becomes faster learning.
#Common complaints (and how this workflow prevents them)
“I’m stuck in an endless debug loop”
Fix: one task per commit + verify after each task.
“It changed stuff I didn’t ask for”
Fix: non-negotiables + phase boundaries + review diffs.
“It forgets decisions / drifts”
Fix: .planning/STATE.md + NN-CONTEXT.md + reset sessions per phase.
“The code works but it’s messy”
Fix: plan-first + incremental commits + small reviews.
“I built a demo and accidentally shipped insecurity”
Fix: prototype vs public boundary + security-lite checklist.
“I feel burned out after hours of prompting”
Fix: work in phases and stop at shippable increments.
#Debug loop escape hatch
- Can you reproduce the bug reliably?
- If no: write clearer steps.
- If yes: continue.
- Did it appear after the last change?
- If yes: revert to the last good commit.
- Ask for root cause + smallest patch
- “Explain the likely root cause in 3 bullets, then propose the smallest patch.”
- Limit patch size
- If it’s big: split into smaller commits.
- If it returns twice
- start a fresh session
- reload only the core docs + context
- redo the minimal fix
#Security-lite for designers (prototype vs public)
If it’s a private demo, keep it simple.
If it’s public or handles real data, do these minimum checks:
- No secrets in code or committed
.env - Input validation on forms
- Auth decision is explicit (even if “no auth for MVP”)
- Avoid random dependencies
- Avoid unsafe dynamic execution
- Errors don’t leak sensitive info
- HTTPS in deployment
- Basic logging for failures
- Basic abuse considerations (even if later)
- Human review before sharing publicly
#If you use Figma → code (practical gotchas)
Figma-to-code fails when you overload context.
Practical rules:
- tokens as Phase 1
- components as Phase 2
- screens as Phase 3
- don’t feed the entire file at once
- name things clearly
#Closing
AI doesn’t replace design thinking. It removes waiting.
If you keep the craft (hypotheses, flows, states, edge cases) and upgrade execution (docs, phases, Git, scoped AI tasks), you don’t just move faster.
You move smarter—and you build products that survive contact with real users.
#Appendix — File prompts (you provide links later)
You said you already have these files and will add links separately. Great.
To keep the workflow manual-free, here are the prompts to generate or refresh each file whenever needed.
#1) Generate / refresh .planning/PROJECT.md
“Draft .planning/PROJECT.md for this product. Ask me only the minimum questions needed. Then write: goal, primary user, job-to-be-done, success metrics, constraints, assumptions/risks, and MVP definition of done.”
Unified Project Brief
The single source of truth for your project. Defines goals, features, stack, and success criteria.
#2) Generate / refresh REQUIREMENTS.md
“Create REQUIREMENTS.md with MVP / V2 / out-of-scope. For each MVP item include: states (loading/empty/error), responsive notes, and accessibility checks.”
Requirements & State Spec
Detailed functional requirements, UI states (loading, error, empty), and data needs.
#3) Generate / refresh ROADMAP.md
“Convert REQUIREMENTS.md into ROADMAP.md with phases. Keep phases small and shippable. Each phase should end with verification.”
Phased Roadmap
Breaks down the project into 5 clear phases with task checklists and git save points.
#4) Generate / refresh .planning/STATE.md
“Update .planning/STATE.md based on our latest progress: what’s done, what’s in progress, what’s blocked, decisions made, open questions, and next 3 actions.”
State Tracking
Tracks current progress, what works, what doesnt, and the last prompt used. Critical for context restoration.
#5) Generate the phase mini-spec NN-CONTEXT.md (example: 02-CONTEXT.md)
“Create 02-CONTEXT.md as a mini spec for Phase 2. Make it designer-friendly: phase goal, in-scope/out-of-scope, screens/components touched, layout rules, spacing, interaction/a11y minimums, states (loading/empty/error), content rules, and a ‘done means’ checklist.”
Context & Rules
Defines your background, preferences, tech stack, and hard rules for the AI to follow.
#6) Turn a phase into tickets (epic → stories)
“For Phase 2 in ROADMAP.md, write 1 epic and 5–8 small stories. Each story must include acceptance criteria and a verification step. Keep each story small enough for one commit.”
#7) Run the phase with the 5-prompt script
“Use these docs as source of truth: PROJECT.md, REQUIREMENTS.md, ROADMAP.md, 02-CONTEXT.md, and .planning/STATE.md. Create a task plan, then implement tasks one by one. After each task: explain what changed, how to verify, and create a Git save point with a clear message.”
#8) Natural-language Git control (no commands)
Use these whenever you need them:
- “Before you change anything, create a Git save point so we can undo if needed.”
- “After this works, commit it as: (message).”
- “Show me what changed since the last save point.”
- “Undo the last save point—the change broke mobile.”
- “Go back to the save point from before we added filtering.”
Next: tool-specific versions
This guide is tool-agnostic. When you publish tool-specific articles (Claude Code, Gemini CLI, Cursor, Windsurf, etc.), keep the same workflow and only swap:
- setup/onboarding
- how the tool reads files/context
- permission model
- preview/run workflow
- best practices unique to that tool